Most materials are in the public domain if they were produced before 1923. I see this as roughly equivalent to everything that happened in the world up to and including World War I! If you’re looking for newspaper articles in Chronicling America, for example, you will note that coverage ends in 1922.
Primary sources produced by the federal government are normally in the public domain both before and after the magic copyright date of 1923. That explains why we as teachers can use the fabulous oral history interviews of former slaves collected between 1936 and 1938 by workers from the Federal Writers’ Project.
Focusing your search using a search operator. [site:loc.gov]
Image Detective Activity (inspired by Crop It lesson)
Being able to find and curate historical source material is a foundation of historical thinking. This activity merges three instructional goals: finding / curating historical sources, looking closely at historical sources and using WordPress tools to add images and hyperlinks. It will help students learn how to find material for future lesson design activities.
For each image: provide full image with citation in hyperlink back to source
Then add a of crop area of each image to show one of the following clues (add clue in the image caption) Tips on how to crop an image
Put all content into a post. Give it a clever title. Include a featured image.
who or what this image is about.
where this takes place.
when this happened or was created.
what is the creator’s point of view or purpose.
something I have a question about
Example: Image with two crops
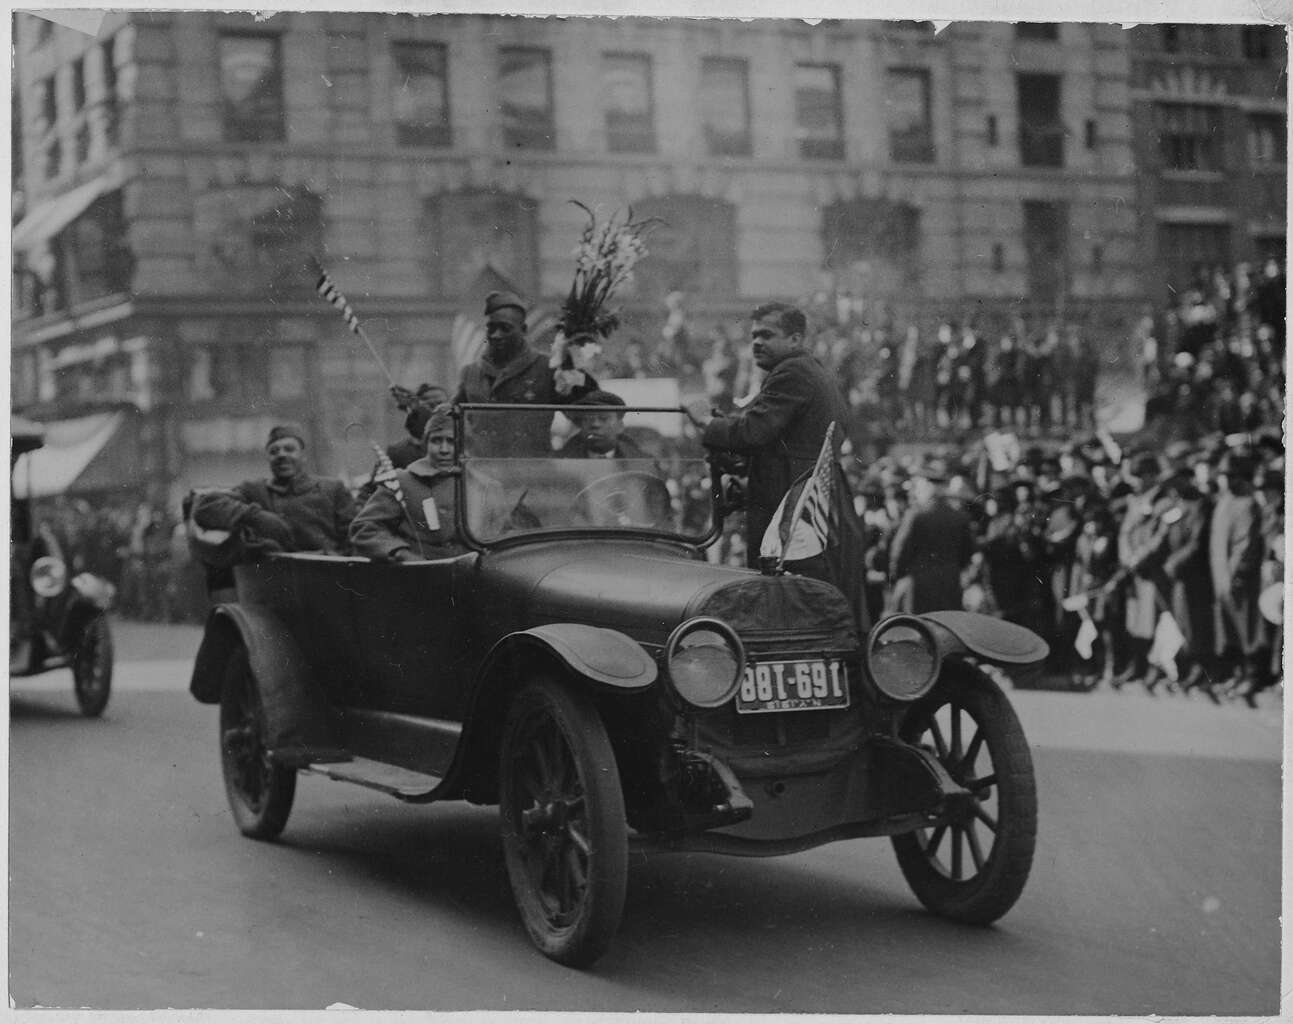
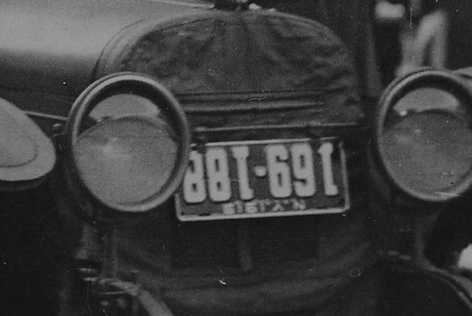
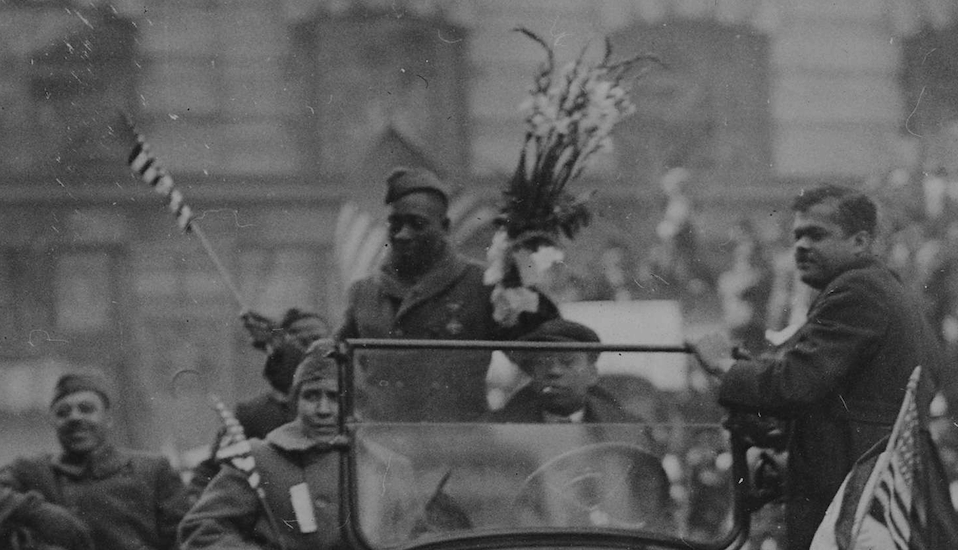
African American Soldiers in an Automobile SourceWhen? It’s an upside down 1919 NYS license plate. I think they are returning Black WWI soldiers in a parade.These Black soldiers are being honored in a parade. Knowing 1919 is in the Jim Crow / KKK era, I wonder what else faced them back in America?
In class practice images. Choose one. Add to a sample post. Include source hyperlink and crop with comment.
Smartly dressed couple seated on an 1886-model bicycle for two 1886. Source
The 8th Avenue trolley, NYC, sharing the street with horse-drawn produce wagon and an open automobile 1904 Source
Automobile helped through sandy wash onto mesa 1911. Source
Women’s Machine Gun Squad Police Reserves, New York City 1918 Source
Notice some of the fashion choices of these women. For example, all but one of these women have chosen to wear pants rather than skirts. Do you think this was a normal clothing choice for women in the 1920s? Could their outfits be related to the social statement they are making?
Teachers are looking for resources for online instruction. So I am reposting lessons from my Social Studies Methods Course at the University of Portland’s School of Education. See original post here.
Teachers can use historical documents to build literacy skills in a content area while empowering students to be the historian in the classroom. But document-based instruction in this context requires four key elements to be successful:
The right documents. (shouldn’t be reliant on background knowledge)
Knowing how to “read” the historical document.
Letting students discover their own patterns, then asking students to describe, compare and defend what they found.
Basing the task on enduring questions, the kind that students might actually want to answer.
In Class 7 we will practice some strategies for assisting students to more closely read a document (in all their multimedia formats) by answering three Common Core questions. Broad version:
What does it say?
How does it say it?
What’s it mean to me?
More specifically, what do we mean by close reading? Teachers can guide students with scaffolding questions that explore “texts” (in all their forms).
Key Ideas and Details:
What does the text say? Identify the key ideas. What claims does the author make? What evidence does the author use to support those claims?
Craft and Structure:
Who created the document? What’s their point of view / purpose? How did the text say it? How does it reflect its historic time period?
Integration of Knowledge and ideas:
Distinguish among fact, opinion, and reasoned judgment in a text. Recognize disparities between multiple accounts. Compare text to other media / genres. How does it connect to what we’re learning?
And what’s it mean to me?
IN CLASS ACTIVITY
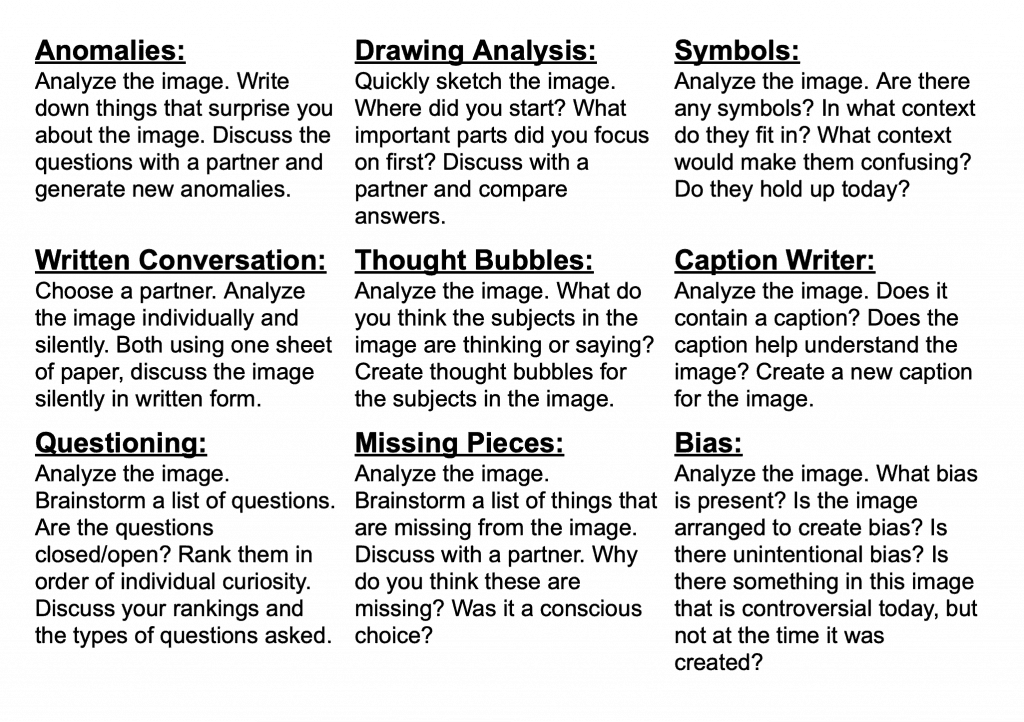
Find a historical image and pair it with one of the Primary Source Icebreakers. The post to the padlet below. Include title of icebreaker, response to prompt and hyperlinked source of image. (See example below) These icebreakers are from TPS Connect at MSU Denver.
Teachers are looking for resources for online instruction. So I am reposting lessons from my Social Studies Methods Course at the University of Portland’s School of Education. See original post here.
Today’s class will focus on finding and curating historical content – in this case images. Our focus will be on sourcing material that is in public domain using our historical archive resources.
Most materials are in the public domain if they were produced before 1923. I see this as roughly equivalent to everything that happened in the world up to and including World War I! If you’re looking for newspaper articles in Chronicling America, for example, you will note that coverage ends in 1922.
Primary sources produced by the federal government are normally in the public domain both before and after the magic copyright date of 1923. That explains why we as teachers can use the fabulous oral history interviews of former slaves collected between 1936 and 1938 by workers from the Federal Writers’ Project.
Class Session
Class will open with a discussion on strategies for supporting remote learning – both in our course and our student placements.
Next, Peter will share some information on public domain and Creative Commons. He will also share strategies for searching using a selection of historical archives.
Students will then practice:
find a historical image
download it
get citation information and source URL
adding image to practice post
include citation with active hyperlink back to source in image caption
Lastly, Peter will introduce this week’s assignment and some strategies for working with WordPress to create learning activities base on close readings of historical images.
Assignment 2
IMAGE DETECTIVE CHOICE 1: (INSPIRED BY CROP IT LESSON)
Being able to find and curate historical source material is a foundation of historical thinking. This activity merges three Instuctional goals: finding / curating historical sources, looking closely at historical sources and using WordPress tools to add images and hyperlinks. It will help students learn how to find material for future lesson design activities.
for each image: provide full image with citation in hyperlink back to source
then add a of crop area of each image to show one of the following clues (add clue in the image caption) Tips on how to crop an image
Put all content into a post. Give it a clever title. Include a featured image.
Possible questions:
who or what this image is about.
where this takes place.
when this happened or was created.
what is the creator’s point of view or purpose.
something I have a question about
Example: Image with two crops
African American Soldiers in an Automobile SourceWhen? It’s an upside down 1919 NYS license plate. I think they are returning Black WWI soldiers in a parade.These Black soldiers are being honored in a parade. Knowing 1919 is in the Jim Crow / KKK era, I wonder what else faced them back in America?
IMAGE DETECTIVE CHOICE 2: CREATE AN IMAGE COMPARE
WordPress now has a built in “Image Compare” block. Find a two suitable images to compare and use the compare to explore continuity and change.
Do the image compare for two sets of images. So you will have two separate “image compares” with guiding questions for each.
Possible questions exploring continuity and change:
what is the same?
what is different?
what do the similarities and differences tell us?
how are they explained by historical events / trends?
Note that this post uses JuxtaposeJS to create the same image compare (it was before it came to WordPress). So ignore that aspect and focus on examples of comparative images and my technique for getting best image alignment. I used Google slides in video. But same technique would work in Apple Keynote.
Here’s a video where I demonstrate how to align the images and export as image files using Google slides. Ignore the fact I was using JuxtaposeJS. I start it about a minute in.
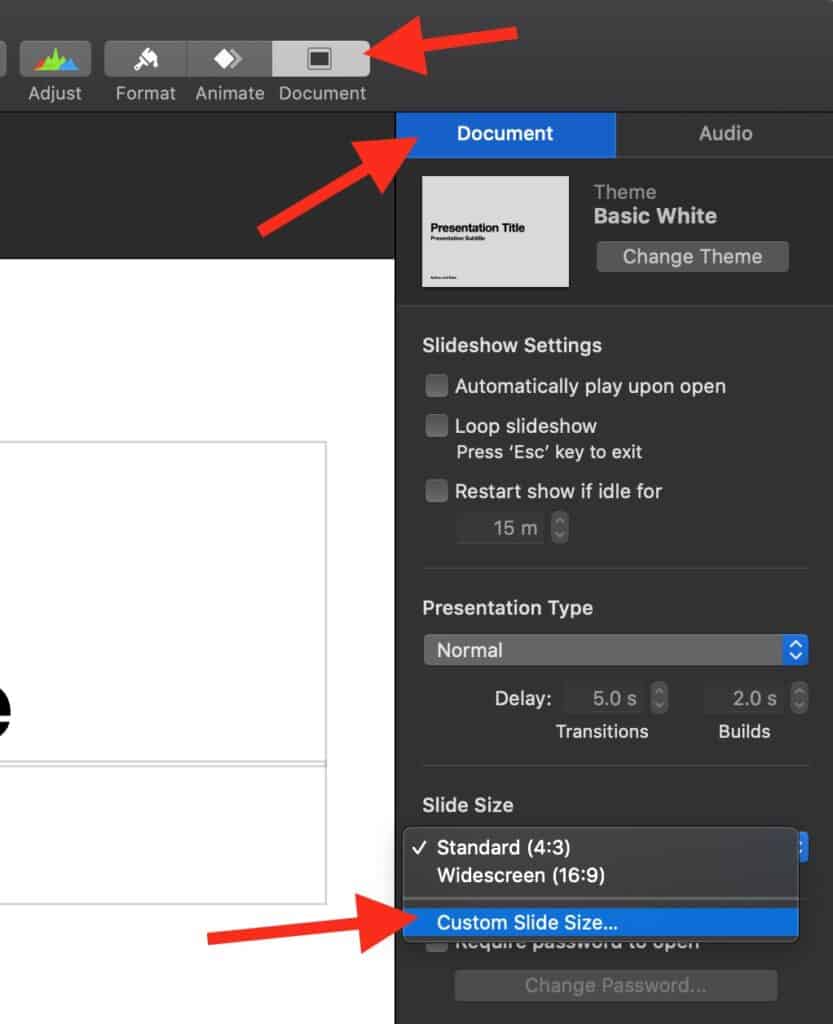
Here’s how to get Keynote into a portrait shaped size for comparing portrait images. Set custom size to 768 width by 1024 height
In Keynote change document format to a vertical portrait shape
Here’s how to align images.
Click on image. Then open Format window. Click on Style. Then adjust the opacity slider to where you want it. Once you have images aligned, remove all opacity. Duplicate the slide with one image on each.
Click on image. Format:style: adjust opacity
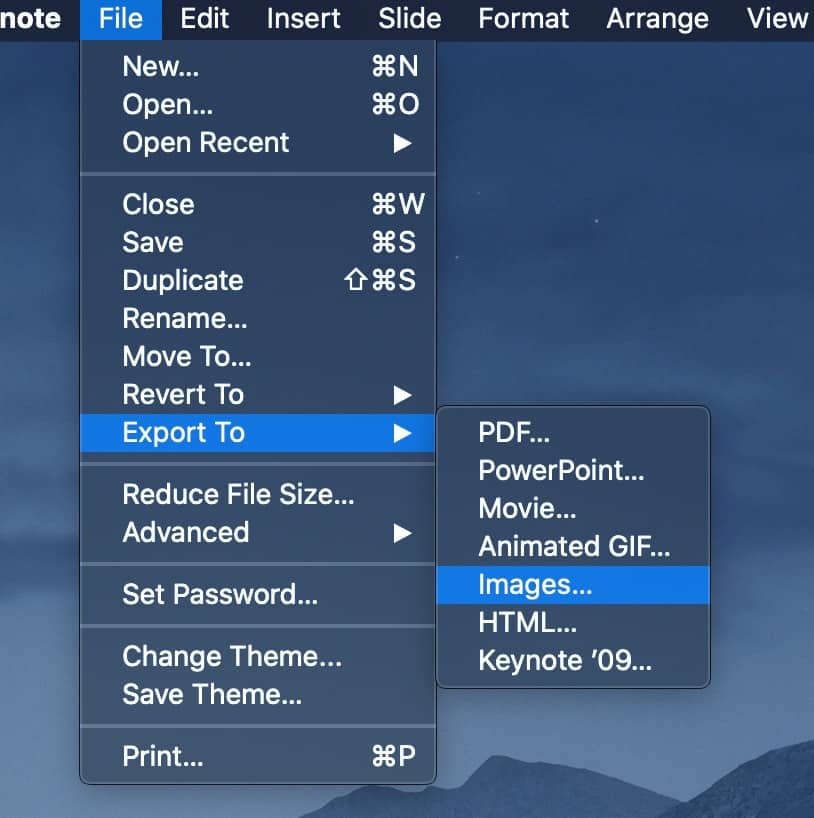
Then export the two slides as images to use in your image compare
I recently ran a edcamp style morning session for our incoming MATs at the University of Portland’s School of Education. Our session goals:
Provide a framework for students to explore ed tech in small project-based learning teams
Model a student centered learning space that takes the instructor out of center stage.
Reinforce that ed tech tools are more than bright shiny objects – they are a tools to inspire your student to investigate, collaborate, create, drive change and take action.
In advance, I created a Google site – “Pandemic Teachers’ Toolkit” that profiled ten free (or freemium) edtech apps. Each app page included a brief overview, how to log in, samples of the app in action, a how-to video on using the app, and instruction on how to get a sample project from the app to a Padlet showcase. The apps were numbered 1-10.
On the morning of the session, I logged in 42 students and I opened with a brief intro and an overview of the morning’s activities. I did a short presentation on the apps using Keynote with some screen shots that highlighted each app and what it could do. I then used Zoom’s built-in breakout group tool to create random groups of four students each. Each breakout group was assigned to explore their corresponding numbered app. The suggestion was for each student in the breakout group to explore the assigned app in parallel fashion and offer help to each other as needed. When they completed a product with the app they posted it to the corresponding Padlet along with comments on working with the app.
As Zoom host I was able to drop in and out of breakout groups offering support as needed. If anyone had a question they could message me via Zoom. After about 30 minutes of work time we all got back together and shared observations. For example – you can’t be in Zoom and Flipgrid simultaneously – the are both fighting over your camera. (Why didn’t I think of that?)
Then we repeated the process and I created 10 new random teams. Some student found themselves back at the same app. So they did not agree to join that group. I was quickly able to see that and assign them to a new group. Students spent about another half hour exploring the second app. They again posted their work and observation to the corresponding Padlet.
I should note that their app-posts were very clever and creative. And their comments were spot on. As a closer, I provided a Google Form exit ticket. Their responses demonstrated that they saw the experience as very valuable and that it achieved it’s goals.
Here’s a two of the exit questions and student responses.
What’s one thing you learned about yourself today?
I learned that I enjoy exploring new technology when it is explained well enough.
I love working on my own! It is my first choice when it comes to work options. However, I did need my partners at times so I’m glad they were there to help me!
I really enjoy meeting new folks outside my cohort! And I’ve become much more comfortable with online teaching over the summer term.
I am better at navigating new apps than I thought I would be.
I need to try something before I understand it, so I appreciated the time to do so.
I enjoy playing around with the different tools within an app to help me understand the best use of my creativity and instruction.
I learned that I’m actually a pretty quick learner with these different platforms, which makes me feel better going forward into the school year next year!
I liked being able to figure out to use the tools. I always find it more engaging to learn by doing instead of being told how to do things.
What’s one thing you learned about edtech today?
These things are free! And a lot of it is integrated with programs I already use. Great stuff!
I have a lot more free, realistic options available to me than I knew about before this morning.
I had heard of some of these online resources before but hadn’t used most of them – this was a cool opportunity to learn how to use these resources, I’ll definitely be incorporating some into my class.
How user-friendly most of the apps are….I was pleasantly surprised.
There are far more resources than I would’ve thought. They were all a lot easier to use than I would’ve thought, too! For someone who struggles with technology, they were surprisingly user friendly.
So many other options for distance learning! I’ll be spending some time just playing around with these apps/sites.
There are a variety of accessible edtech tools that I was previously unaware of that could make remote teaching more engaging.
These virtual and augmented reality programs allow the user to shift their point of view and experience the legacy of segregation in America. Students and teachers can “step inside” these immersive environments and feel the weight of systemic racism. These cutting edge approaches can inspire the next generation in America’s fight for social justice. Descriptions by creators.
I am a Man VR
I Am A Man” VR Experience is an interactive virtual reality experience set to the historic events of the African- American Civil Rights Movement. Users will witness the 1968 Memphis Sanitation Worker’s Strike and the events leading to the assassination of Dr. Martin Luther King, Jr. using the Oculus Rift VR headset. The VR project was created by Derek Ham and won an award for funding through the Oculus Launch Pad program.
Traveling While Black
Traveling While Black is a cinematic VR experience that immerses the viewer in the long history of restriction of movement for black Americans and the creation of safe spaces in our communities.
Academy Award winner Roger Ross Williams and Emmy Award-winning Felix & Paul Studios’ film transports you to historic Ben’s Chili Bowl in Washington DC. The viewer shares an intimate series of moments with several of the patrons of Ben’s as they reflect on their experiences of restricted movement and race relations in the U.S.
1,000 Cut Journey
1,000 Cut Journey is an Immersive Virtual Reality experience in which participants embody a Black male, Michael Sterling, experiencing racism as a child through disciplinary action in the classroom, as an adolescent encountering the police, and as a young adult experiencing workplace discrimination.
Mapping Amache
Mapping Amache: The Amache Internment Camp is located near Granada, Colorado. It is where over 10,000 Japanese-American citizens and persons of Japanese ancestry were forced to live from 1942-1945. It is also called Granada Relocation Center.
This weblog is intended to follow along with the long-term project of mapping this one square mile of earth where so much history took place. The basic map of Amache has been developed over the last few years. There are layers for things like roads, boundary, housing blocks, barracks and so forth. The challenge is to present this information in a way that makes it useful, accessible and honors the people who lived there.